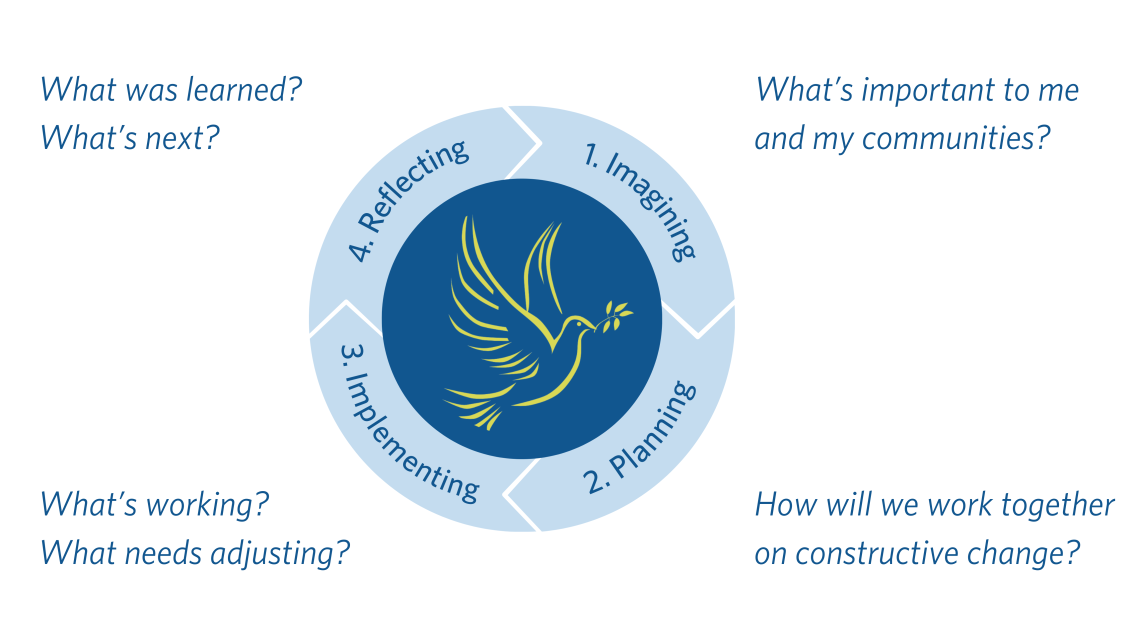
The Project Cycle
What is the Project Cycle?
The Project Cycle is a management tool that can help applicants and grantees create thoughtful, meaningful projects. It can also help campus liaisons mentor their students.
It is composed of four stages: Initiating/Imagining, Planning, Implementing, and Closing.
Below, you’ll find information about each stage, including an interview with Middlebury College campus liaison Heather Neuwirth Lovejoy and prompts to inspire discussion, creativity, and critical thinking. This content is designed to help applicants and grantees apply the Project Cycle to their work.
Not every prompt will be relevant to everyone but all projects will move through these four phases. Keep in mind that the cycle doesn’t always move in one direction. It’s often necessary to take a step back and reconsider your next move, rather than rushing ahead.
Stage One: Initiating/Imagining
At this stage, we invite you to think expansively about how you want to contribute to a more peaceful world.
Even if you already have a specific project idea or location in mind, use this stage to explore the values and assumptions that led you to that idea, and to entertain alternatives. Invite others to imagine possibilities with you.
Watch this video to hear how Heather Neuwirth Lovejoy advises students at this stage.
Questions About Initiating/Imagining
Q What should I do to get started?
You might begin with some reflection. Try asking yourself:
- What is peace?
- What’s important to me? What’s important to my communities?
- What issues motivate me? What approaches energize me?
- Who shares this vision with me? What alternate perspectives do I need to seek out?
- What are my strengths, resources, and areas of weakness?
- What collaborations do I envision?
- What can I do now to get to know potential partners, their interests, their strengths, and their availability?
- What criteria should I use to prioritize my ideas so that I have a feasible plan?
Q Where can I look for inspiration and guidance?
A great place to start is a meeting with your campus liaison. You’ll want details about Projects for the Peace timeline and campus-specific requirements. In addition, you might try:
- Reading through successful grantees’ proposals and final reflections (reports) posted on the Project Archive page of this website.
- Finding thought partners who support you and challenge you.
- Researching your proposed issues, approaches, and locations. Who else is working on ideas similar to yours, and what they have learned? What conflicts or inequities exist that may be pertinent? What’s going well that you might build on?
Stage Two: Planning
During this stage, you will refine your project concept. That means assessing your resources—time, money, skills, knowledge, and networks— and creating a feasible plan.
By the end of this stage, you’ll be ready to submit two documents for submission: the proposal narrative and the project budget. These documents are essential in terms of securing Projects for Peace funding but are only two components of your roadmap for implementation.
In this second project cycle video, Heather shares best practices for creating your proposal and budget, as well as a variety of tips for how to successfully transform ideas into plans.
Questions About Planning
Q How do I refine my project goals?
Try asking yourself:
- What is at the heart of this project? What will I/we do and why?
- How am I including others in defining goals?
- During the project, how will I/we know if I am making progress?
- What are the major milestones?
- What aspects of your project goals can be easily quantified? What aspects can’t?
- At the end of the project, will something be different? How will I/we know?
Q How can I start building relationships with community partners?
Each Project for Peace community looks different. You may be working in a community that is new to you, or someplace where you have strong ties. You may be doing a project alone or with a project team. In all instances, establishing and nurturing partnerships is integral to successful projects.
You might begin by listing who exactly you intend to work with, and why. Assume this list will evolve throughout your project.
Getting ready to partner involves self-reflection and perspective-taking. Try asking yourself:
- How do I want to “show up” for these and other colleagues?
- How do I typically engage when a conflict occurs?
- How will my values be present—and transparent—in the ways I engage with partners?
- What may impede or facilitate someone’s interest and/or availability in working with me?
- What expectations do we have of one another before, during, and after the project? How can we manage expectations as we implement?
- Who will be involved in decision-making? Why?
- How will we manage any language or communication barriers?
- What conflicts already exist among partners or might arise in the course of the project?
- What can I do to prevent or manage conflicts about goals, schedules, budgets, or anything else?
Q How should I develop my project schedule?
Begin by drafting a timeline. List out the start and end dates for your project as well as any major milestones (achievements) along the way so you can sort them chronologically and get a sense of the pacing.
Next, brainstorm and sequence the large and small tasks that are necessary for implementing your project. Add dates and integrate the tasks into your timeline. Notice any dependencies (when one task depends on another task being completed) and think through where you do or don’t have flexibility.
Ensure you are supporting equitable participation by considering the schedules of those you will work with—are there times of the day/month/year when they are more or less available? Ask about holidays, childcare responsibilities, work activities, transportation availability, weather patterns, academic calendars, etc., and then adjust your timeline accordingly.
Don’t forget to schedule check-ins with your campus liaison, mentors, or other thought partners throughout the project, and remain aware of interim and final report deadlines.
Q How should I develop my budget?
You can begin by reviewing the Projects for Peace budget template and guidance, and brainstorming all of the expenses you expect to have for each category. Review your timeline and highlight the tasks and activities that have associated costs.
Ask your campus liaison about how the transfer of funds works on your campus so that you understand the process and timing.
Don’t forget to include taxes, exchange rates, bank fees, seasonal shifts in cost, transportation costs, funding for social events, and/or a closing celebration. Your campus liaison may have other tips.
Try asking yourself:
- Am I confident that I have realistic (and local) estimates of costs? If not, how can I improve my estimates?
- Might costs vary according to season or location of purchase? What trade-offs might I need to make for convenience and cost savings?
- What will I do if my costs exceed my budget? What can I do if I have funds left over?
Q How do I include safety and well-being in my planning?
Take the time to plan for accommodations, transportation, communication channels, sources of food, access to healthcare, medicines, tax liabilities, and sources of support in case of an emergency.
You can also run through different scenarios with thought partners: What could go wrong? How can we prepare? What contingencies can we put in place?
Be sure to check in with your campus liaison on campus-specific deadlines and requirements related to safety and health, so that you are working in accordance with risk-management policies.
Q How do I complete my Projects for Peace application?
The steps for completing an application should include the following:
- Download the proposal and budget guidance from this website, and review them carefully.
- Confirm the application process with your campus liaison. What are the internal (university/college) deadlines? Will you receive feedback? Will there be an interview?
- Draft and redraft your proposal and budget, and seek feedback from mentors and partners.
Keep in mind that the proposal narrative is just two pages, so it can’t function as a comprehensive project plan. You’ll want to organize and retain all your notes.
Stage Three: Implementing
At this stage, your Project for Peace has been awarded funding. Congratulations!
No matter how much attention you’ve given to the previous stages, implementing a Project for Peace will bring unexpected challenges that require you to pivot and reset. This may be frustrating, but it is normal during the implementation of a complex project.
In this third video, Heather discusses ways to set yourself up for success, and the pitfalls to watch out for.
Questions About Implementing
Q How can I stay on track while implementing my project?
We suggest you keep your planning materials close as there will certainly be unexpected events and your earlier notes will help you stay on track and consider pivots. It can help to keep a log of reflections, disappointments, new ideas, progress, decisions, and expenditures. The log doesn’t need to be a written document: try recording voice memos on your phone or taking snapshots of key moments.
Note that implementation activities may begin before you leave campus.
Regularly ask yourself:
- Am I on schedule? If not, what adjustments can I make?
- Am I on budget? If not, what adjustments can I make?
- What changes might I need to make to my overall plan? Who do I need to discuss these changes with?
Q How do I strengthen relationships with community partners?
Throughout implementation, you should meet regularly with community partners to create plans and seek feedback. Listen to new ideas with an open mind.
Together, you can celebrate milestones and learning. Don’t be afraid to admit missteps or failures.
During those gatherings, think about who is “in the room” with the ability to influence the project, and who may have been inadvertently left out and need to be included next time.
Make sure to attend to the people around you and acknowledge the various demands they have on their time. It may be important to spend time relaxing together, not just working.
Q How can I strengthen my project?
Here are some ideas and steps to consider:
- Revisit your intentions by rereading your proposal and planning notes.
- Notice constructive failures: these are missteps or barriers that open new possibilities.
- Ask about community strengths and assets, and find ways to sustain or enhance them.
- Reflect on the inequities and/or conflicts you are noticing in your project community. How might you address them (now, or in the future)?
- Learn about ethical storytelling and photography: https://ethicalstorytelling.com/about/
- Check in with your campus liaison regarding your progress and expenditures.
- Attend any Projects for Peace events to meet other current grantees.
Q Do you have any advice for maintaining personal well-being?
The pace of implementing a Project for Peace can be fast, so be sure to take breaks.
Avoid unnecessary risks. Pay attention to local and regional events and news.
Let friends know how you’re doing, and ask for help if needed.
Stage Four: Closing
Plan ahead to finish strong!
This is the stage when you consider what comes next in your peacebuilding journey, and how you will share your Project for Peace experiences. This includes your final reflection.
In this last video, Heather reflects on how she has seen Projects for Peace experiences impact grantees and their campus communities, and offers advice for successfully wrapping up the experience.
Questions About Closing
Q How do I close out my Project for Peace?
Closing out a project involves summarizing what has occurred and acknowledging what remains to be done. It might also include publicly presenting the results of the project to the broader community.
Some steps to consider:
- Find time to debrief the project with partners. Ask: What worked? What didn’t? Who was and wasn’t included? What would we do differently next time?
- Be transparent and realistic with your project partners about what next steps you can commit to, if any. Make arrangements to stay in touch.
- Showing gratitude to those who worked with you—both individually and publicly—is an important part of the closing stage. You might hold a “ceremony” or event to mark the end of the project and share a meal, stories, and photos with your partners and the general public.
Q What is ethical storytelling?
How you tell your story has a real and lasting impact. Learn more by reviewing an ethical storytelling pledge, here: https://ethicalstorytelling.com/pledge/
Among other things, ethical storytelling means representing community partners and participants in the way they want to be seen. Make sure any people in photos you want to share have provided fully informed consent when the photo was taken, and that the narratives around them are not exploitative.
Q How can I prepare for my return to campus or future work?
Don’t skip personal reflection! Read over your original proposal, planning materials, and activity log. In addition, try asking yourself:
- What skills did I practice in the course of this project? What skills do I want to improve?
- If I had additional opportunities to contribute to peace, what would I propose?
- What did you learn about yourself? What did you learn about others?
- Think ahead—what would you include if you were asked to present to your classmates or Projects for Peace applicants?
- How will this project influence what I do next with my studies and/or career?
- How might you describe the project on a resume or in a job interview?
You might also ask your thought partners what they’ve observed about you throughout the project.
Q How should I prepare my final reflection materials?
The steps for completing a Projects for Peace final reflection should include the following:
- Download the final reflection guidance and expense report template from this website, and review them carefully.
- Confirm the final reflection process with your campus liaison. What are the internal (university/college) processes and deadlines?
- Draft and revise your narrative. Edit to remove any sensitive content and keep the tenets of ethical storytelling in mind.
- Double-check your expense report for accuracy.
- Select photos and ensure you have full consent to share them.
- Seek feedback from mentors and thought partners.
Keep in mind that the final report is just two pages, so it won’t capture your full experience: be sure to organize and retain all your notes, photos, and materials.